How to build a Shopify app powered by a Python + Flask backend service
Building a Shopify App #
So you decided to create an app for Shopify and launch it on their app store - that’s so exciting! I’m sure that this guide will help you get up and running quickly and at the same time give you a foundation that you can scale.
I’m sure you have already seen it, that Shopify offers some really nice tooling to spin up the backend for your next Shopify app, but it only works it’s magic for NodeJS and Ruby, so if you are like me and are more into Python, then you have to do it all yourself.
I’ve seen a couple of examples out there which gives you the bare bones approach to get your app up and running, which is nice but not enough.
I decided to take my knowledge from building a couple of Shopify apps and give you a more comprehensive backend service that you can easily adapt and scale to fit your needs.
I’ve created a couple of Shopify backends written in Python + Django & Flask and it’s been fun, but some parts have been quite annoying to figure out. So I thought, why not share my learnings with you, so that you don’t have to make the same mistakes as I have done and also speed up the time it takes for you to get your next Shopify app up and running.
This guide is broken up into different sections
- Which features does this Shopify Boilerplate app have
- How to install and run the backend
- How to create a Shopify app and connect it to your backend
- How to run unit tests
- How to monetize your app, enable subscription and usage based billing with the Shopify Billing API (coming soon)
- How to release the app in the Shopify App store (coming soon)
The Python Flask Shopify App Backend Service Boilerplate #
This service is built with the “backend for frontend” pattern, which means that the app is responsible for interacting with Shopify and other services that are internal to your business.
The features of this boilerplate app are:
- The backend is dockerized so you can easily get it up and running on your local dev machine
- Handle app installs from merchants (ie when they click on the app in the Shopify app store)
- A starter for the Shopify admin page using Bootstrap Shopify Polaris
- Endpoint to receive merchant profile updates from your Shopify app
- Subscribe to and act on webhooks (especially the order/paid hook)
- Database migrations
- Unit tests
Features that will be described in a separate post
- Setup recurring and usage charge billing for your app using the Shopify Billing API (ie sell you app on the Shopify app store)
- Examples for how to interact with other services, like sending order information to other services
Installation #
Prerequisites
- Docker
- Docker compose
- Ngrok or similar
- A Shopify partner account
- A shopify store
- A cup of coffee or similar to keep you running
Download and run the backend service #
- Clone or download the GitHub repo
- Start ngrok by executing
ngrok http 5000in your shell to have it forward traffic to the backend app - Create a
.envfile in the root directory of the app with the following content
SHOPIFY_API_KEY=•••••••••••••••••••••••
SHOPIFY_SHARED_SECRET=shpss_••••••••••••••••••••
HOSTNAME_FOR_SHOPIFY="https://<your-ngrok-tunnel>.ngrok.io"
SHOPIFY_BILLING_TEST_MODE="true"
WEBHOOK_TEST_MODE="false"
LOG_LEVEL="DEBUG"
- Navigate to the backend folder and type
make run
This should create and run a Postgres database and the backend service in two different docker containers. The backend service will be listening to port 5000
Now test that it’s working
curl https://<name of your ngrok>.ngrok.io/health
The output should be something like this
{"message":"It's alive!","status":200}
Database migrations #
The backend app used Flask-Migrate to handles SQLAlchemy database migrations. When the service runs we run any new migrations that have been added since the last start of service. Checkout the docs for Flask-Migrate if you want to know more.
Create your database and database tables
This step is only required to run when your Postgres docker container has been created (so usually not that often…)
First list your running containers
docker ps --format "table {{.ID}}\t{{.Names}}\t{{.Command}}"
It should give you this
CONTAINER ID   NAMES                COMMAND
24c23ad98e2f   backend_taco-api_1   "sh -c 'flask db upg…"
cc29f6887de3   backend_taco-db_1    "docker-entrypoint.s…"
Notice the name of the backend_taco-api_1 container
Now connect to the api container listed from the previous step
docker exec -it backend_taco-api_1 bash`
Then run the following commands
flask db init
flask db migrate -m "inital"
flask db upgrade
ps. You shouldnt have to run the steps in this section but they are here in case you run into issues with your postgres container.
To run unit tests #
The unit tests can also be run in a docker container.
- Navigate to the backend directory and type
make test
When you continue make sure that your backend service is running make run.
Create a Shopify App in the partner dashboard #
Now we need to create a Shopify app so login to Shopify using your partner account and hit the button “Create app” which can be found in the sidebar menu “Apps” section.
Next you should be presented with an option to either create a private or public app. Shopify already provides you with the important information about these two options.
In short
- Create a public app if you want to be able to make money by charging merchants a subscription or usage base fee.
- Otherwise create a private app
Either option you choose will give you a form with some things you need to fill in.
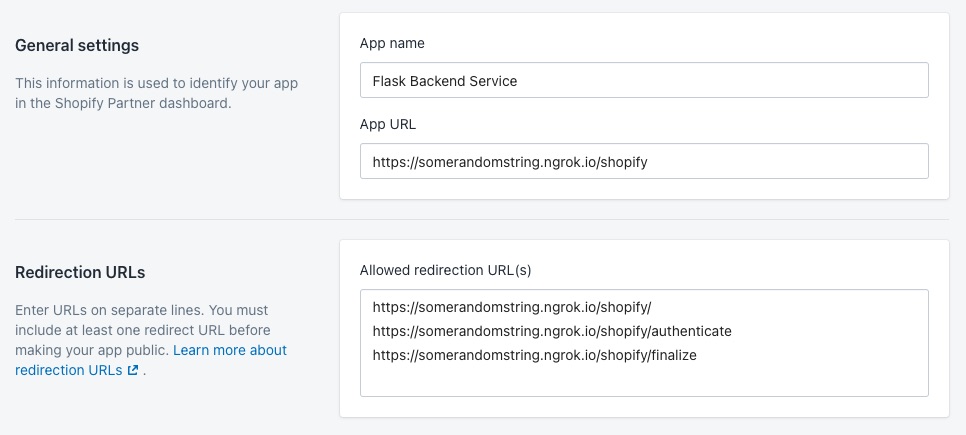
- Make sure to replace the somerandomstring with your ngrok details.
- Also make sure to give your app a meaningful name, this is very important because it will turn into the slug of your app when listed in the Shopify app store.
Once you are done go ahead and click the “Create app” button.
Enable your backend service to communicate with your newly created app #
Now you should have a Shopify app, a backend service and a ngrok tunnel running but we are not quite there yet.
You need to update your .env with the Shopify API keys which you probably noticed when you created the Shopify app.
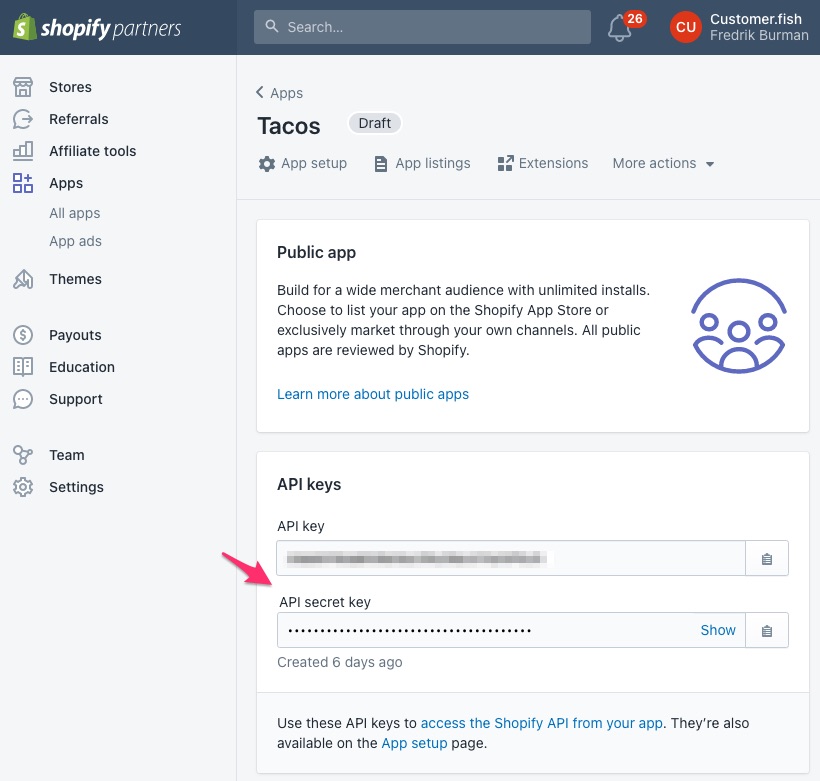
It should be pretty obvious where you should put the Shopify api keys (hint, the api secret key goes into the SHOPIFY_SHARED_SECRET).
The WEBHOOK_TEST_MODE variable will be used later on when we add the Shopify billing api integration.
The WEBHOOK_TEST_MODE is set to false as a default which enables validating that webhooks are coming from Shopify.
If you want to test webhooks by sending your own requests to the backend service I recommend that you set this to true and restart your docker containers.
You also need to update the HOSTNAME_FOR_SHOPIFY with your ngrok url.
If you are on the free ngrok plan
You will need to update the settings AND your Shopify urls in the partner dashboard everytime your ngrok tunnel is restarted because you will get a new url from ngrok.
Thats it, now your backend service should be connected to your Shopify app.
Don’t forget to restart your docker container for the changes to take effect
Let’s test your app in a Shopify development store #
If you havent already created a Shopify store then go ahead and click on Stores in the Shopify partners dashboard, then click “Add store”.
When asked about which type of store you want to create, select “Development store”, then fill out the rest of the fields, should be fairly easy to figure out what you should do.
Once the store is created head over to the Apps section, click on your app and then look for the section that says “Test your app” and click on the button.
Then select the store you want to add the app to.
Next you should be presented with a screen asking you to give the app permissions to your store.
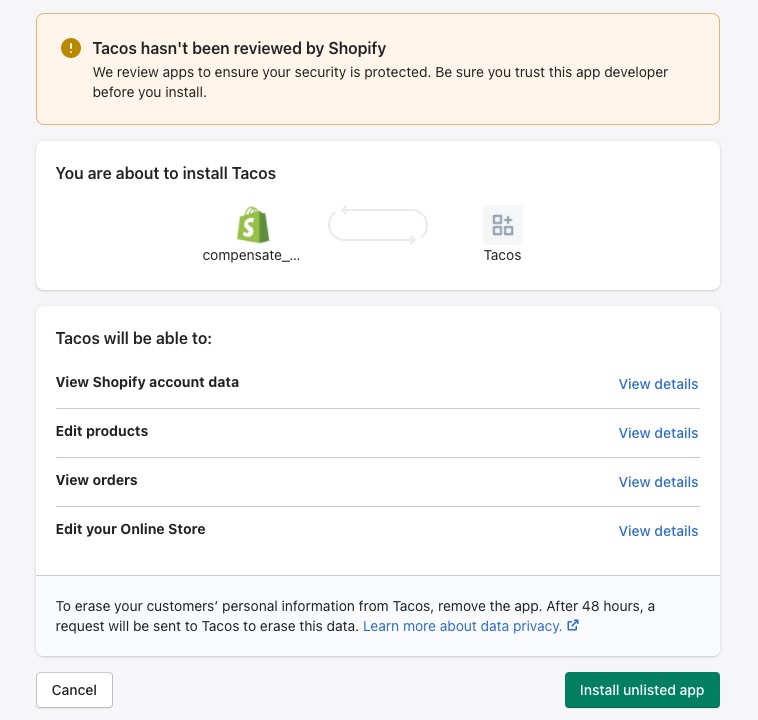
Just hit the “Install unlisted app” button and then you should see something like this
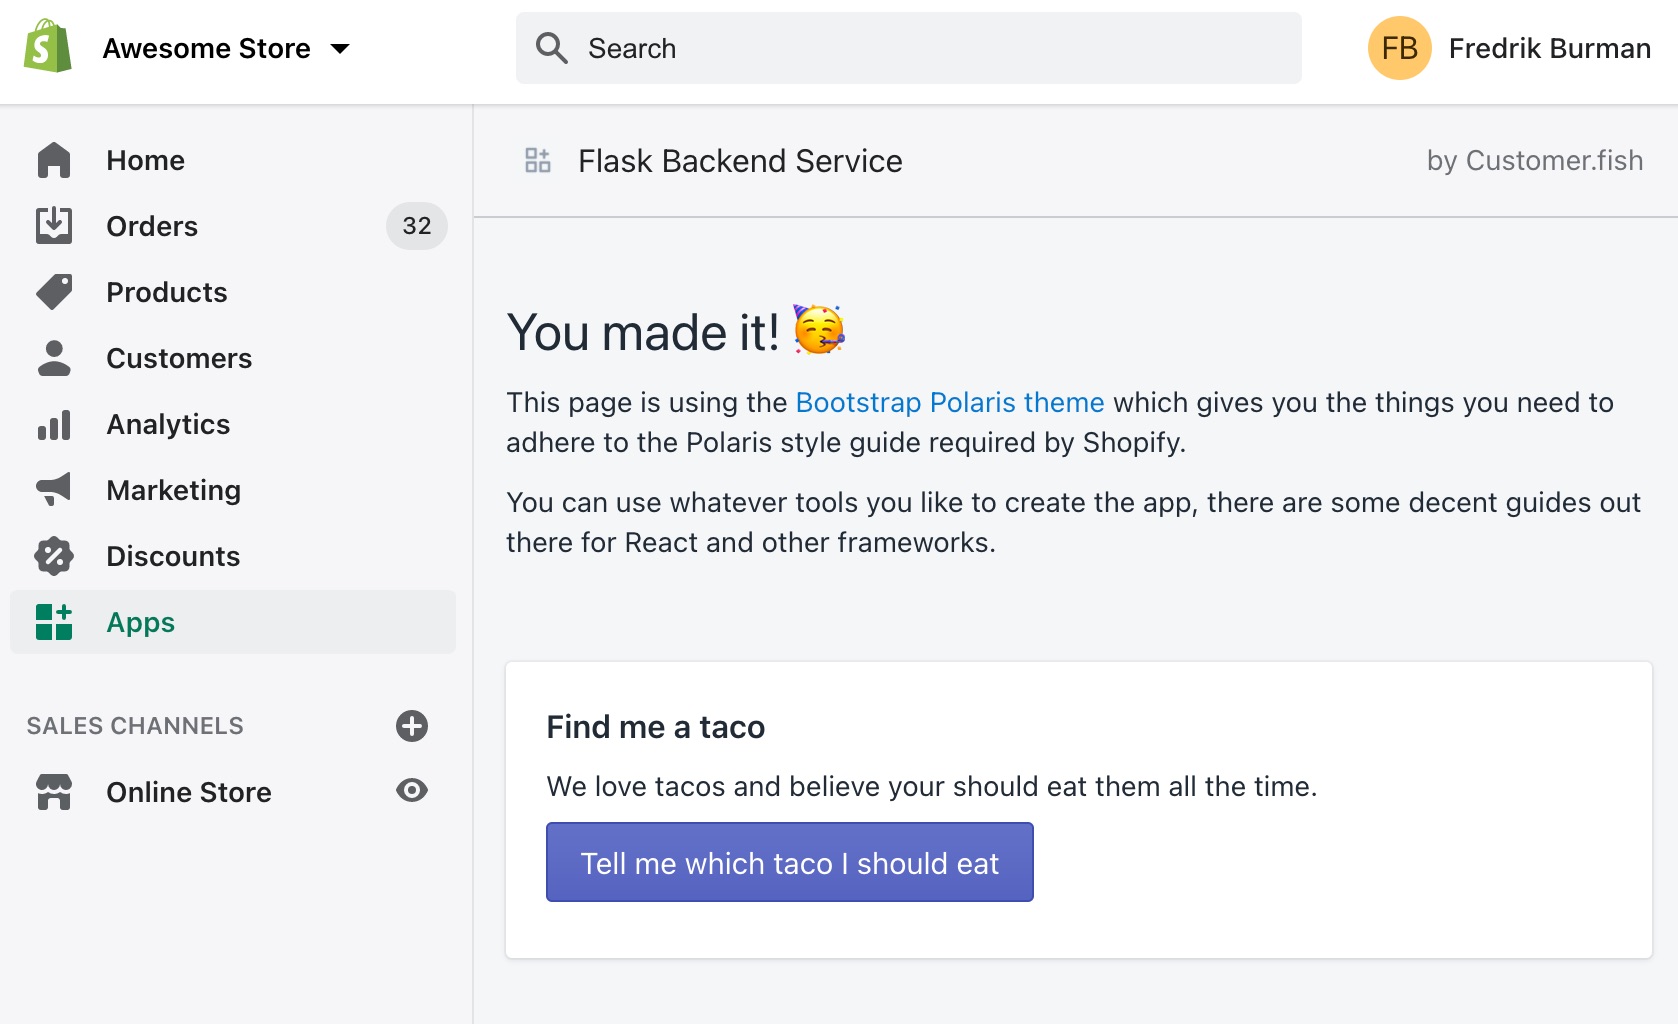
Congrats if you made it this far 🥳 you should now be ready to add the stuff that creates value to your customers.
Where to go from here #
Oh crap, I forgot to mention some relevant things about this Python Flask Shopify starter app! I got so wrapped up into getting it up and running that I almost forgot to tell you how it works and how you can extend it to fit your needs.
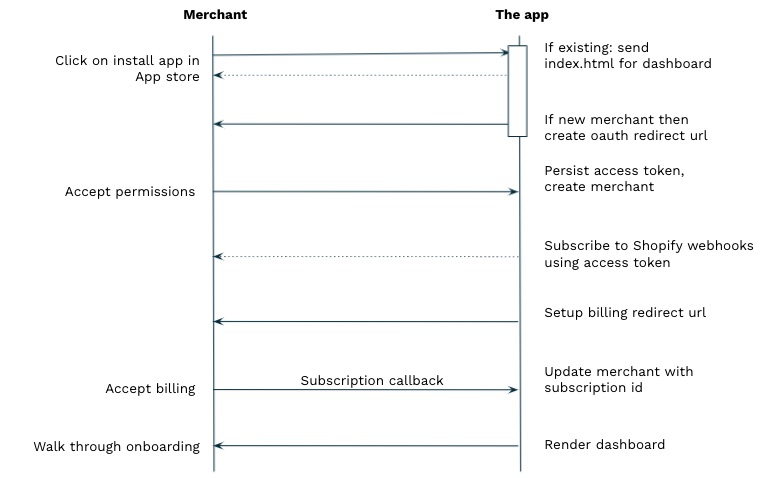
First let’s talk about the Shopify app installation sequence, it’s not that complex but it’s worth having this overview in mind.
If nothing else it will help you get a feeling for which API endpoints are available in this backend service and how they are used.
All of the relevant API endpoints are available in the app_shopify/views.py file.
What about the file structure #
The directories you should be spending the most amount of time while developing your app in are app_shopify, service and models.
backend
├── Dockerfile
├── Dockerfile.dev
├── Dockerfile.test
├── Makefile
├── README.md
├── app.py                   <-- App entry point
├── app_shopify
│   ├── __init__.py
│   ├── common.py
│   ├── templates
│   │   ├── 400.html
│   │   ├── index.html
│   │   └── install.html
│   ├── views.py             <-- API endpoints are found in here
│   └── webhooks.py          <-- Do things with webhooks
├── common
│   ├── __init__.py
│   ├── auth.py
│   ├── const.py             <-- Good place for constants
│   ├── extensions.py
│   └── parsers.py
├── config.py
├── docker-compose-test.yml
├── docker-compose.yml
├── migrations
├── models
│   ├── __init__.py
│   └── profile.py           <-- Data model for merchant
├── requirements.txt
├── service                  <-- All business logic should go in one or more services
│   ├── __init__.py
│   └── profile.py
├── tests
│   ├── __init__.py
│   ├── base_case.py
│   ├── const.py
│   └── test_app_shopify.py
└── wsgi.py
Handling webhooks #
When the merchant installs the app we call the add_webhooks() function which subscribes our app to receive
webhooks from Shopify.
The webhooks you want to subscribe to easily configurable in the common/const.py file variable SHOPIFY_WEBHOOK_TOPICS.
By default we subscribe to the following topics
- uninstall: so that we can disable merchant accounts when they uninstall the app
- orders/paid: so that we can do stuff when a customer buys something from the merchant
All webhooks hit the endpoint /webhook which calls the function handle_webhook() in the file app_shopify/views.py
The webhook handler does the following
- Validates that the message is coming from Shopify and a merchant that installed your app
- calls the appropriate function in
webhooks.py
The function to call is found by looking into a dictionary of functions (called handler), this is where you can add / remove things
specific to your app. Make sure to keep the customers/redact and customers/data_request because these are mandatory
by Shopify.
webhooks.py
# Extend this to enable handling of other webhook topics that you subscribe to
handler = {
    'app/uninstalled': uninstall,
    'orders/paid': order_paid,
    'orders/fulfilled': order_fulfilled,
    'customers/redact': gdpr_customer_data_erasure,
    'shop/redact': gdpr_shop_data_erasure,
    'customers/data_request': gdpr_data_request
}
The webhook handler is implemented in a way that if we are unable to process the webhook then we will send a http 500 back to Shopify which means that they will try to resend the webhook. This is not optimal but is easy to get started with.
A more appropriate and scalable way to handle webhooks would be to decouple the receiving of webhooks from the proessing using some sort of queue and worker process pattern or similar.
Updating Shopify permissions (oauth scopes) #
As you probably figured out already Shopify is using oauth, this means that you can define what things you want to be able to access on behalf of a merchant, a full list of oauth scopes can be found here.
You can easily change the scopes you want to ask for permission to in the file common/const.py and variable SHOPIFY_OAUTH_SCOPES.
What about integrating with Shopify Billing API? #
Are you interested in making money with your app by charging merchant whenever they use your app? Would you like to get a head start and get access to code showing you exactly how to:
- Setup a monthly subscription fee for your app
- Charge merchants based on how they use your app (usage charges / metered billing)
Just follow and DM me on Twitter saying that you are interested in making money with your app and I’ll get back to you with details, my handle is @fredrik_burman
Parting thoughts #
Thats it for now, I probably forgot to mention some things, you might have questions or things that you would like to improve. Feel free to create a pull request and I will review it or follow / DM me on Twitter.
Oh yeah, you might be interested in learning more about the way I like to structure my code using a variant of the MVC pattern that is commonly referred to as MVCS, where the S stands for service. If so you should check out my post How to structure your code, an MVCS approach (Model View Controller Service)